Module 2C: Light Ratios
C. Light Ratios
Getting Started
The study of light ratios begins with the fundamental photographic idea of how to use f-stop, shutter speed, and ISO. As you have learned, the f-stop represents a quantity of light that reaches the sensor based on a given shutter speed at a given ISO.
If we go back and review the basics of f-stops, we know that moving from one f-stop to the next larger lens opening (whole stop) allows twice the amount of light to reach the sensor.
For example, moving from F16 to F11 doubles the amount of light reaching the sensor.
Conversely, moving from one lens opening to the next smaller lens opening (whole stop) cuts down the amount of light reaching the sensor by half.
So, moving from F11 to F16 reduces the amount of light reaching the sensor by half.
It is important to recognize that the increase or decrease of exposure through the f-stops (and shutter speeds) is exponential, not linear. Let’s take a look at how this is carried out over a number of f-stops:
Starting at F16, moving to F11 doubles (2X) the amount of light reaching the sensor.
F16 to F11 = 2X the light
Moving from F11 to F8 doubles the amount of light again! So F8 allows 4X the amount of light to reach the sensor than F16 allows.
F16 to F11 = 2X the light
F16 to F8 = 4X the light
(If you had $1 and it was doubled it for you, you would have $2, If it was doubled it again, you would have $4.)
Moving from F8 to F5.6 doubles the amount of light again! So F5.6 allows 8X the amount of light to reach the sensor than F16 allows.
(If your previous $4 was doubled, you would now have $8.)
Moving from F5.6 to F4 doubles the amount of light again! So F4 allows 16X the amount of light to reach the sensor than F16 allows.
(If your $8 is doubled, you would now have $16.)
By now, you probably see the trend and that moving from F16 to F 2.8 allows 32X the amount of light that F16 allows.
With whole stops, F1.4, F2, F2.8, F4, F5.6, F8, F11, F16, F22, F32 and beyond, whichever f-stop you begin with, the following is true:
Opening the lens by / Increases the light that reaches the sensor
1 stop = 2X
2 stops = 4X
3 stops = 8X
4 stops = 16X
5 stops = 32X
6 stops = 64X
7 stops = 128X
8 stops = 256X
Closing the lens by / Decreases the light that reaches the sensor
1 stop = 1/2X
2 stops = 1/4X
3 stops = 1/8X
4 stops = 1/16X
5 stops = 1/32X
6 stops = 1/64X
7 stops = 1/128X
8 stops = 1/256X
In the above examples, the amount of light given off by the light source is not changing, only the amount of light passing through the diaphragm of the lens and reaching the sensor is changing. Think of it as opening or closing the blinds in a window to allow more or less light into a room. The light outside is not changing, only the amount of light allowed into the room (sensor) is changing.
The Cumulative Property of Light
Imagine a white box that is turned so that the camera can only see a single side of the box. If one light is set up and the light is measured at f8 at the single, visible panel, then the exposure will simply be f8.

If a second, identical light was added, which is also set to f8, that doubles the amount of light on that panel and increased the amount of light on that panel by 2X.
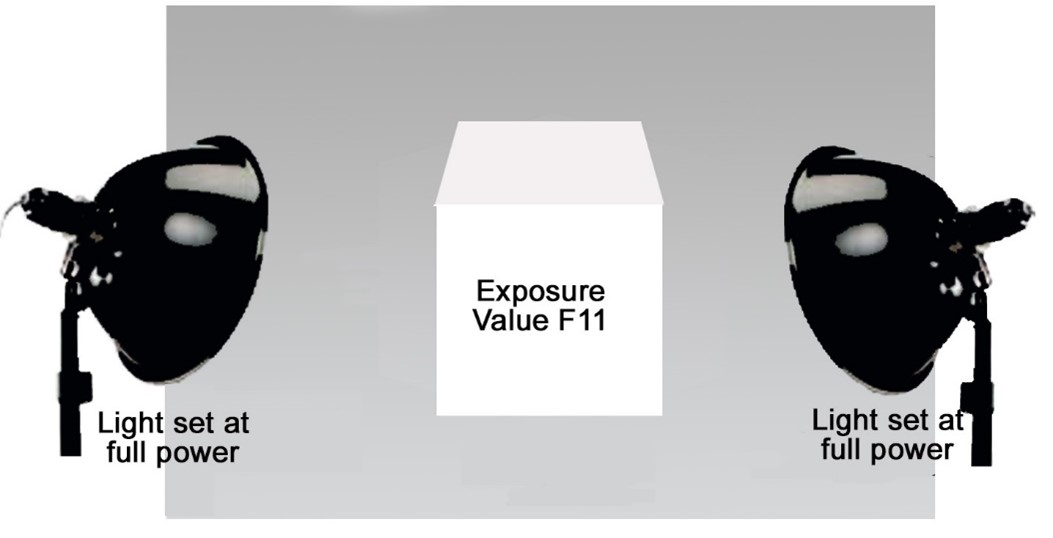
To properly expose this panel, we now need to set the f/stop at f/11.
This example demonstrates the cumulative property of light.
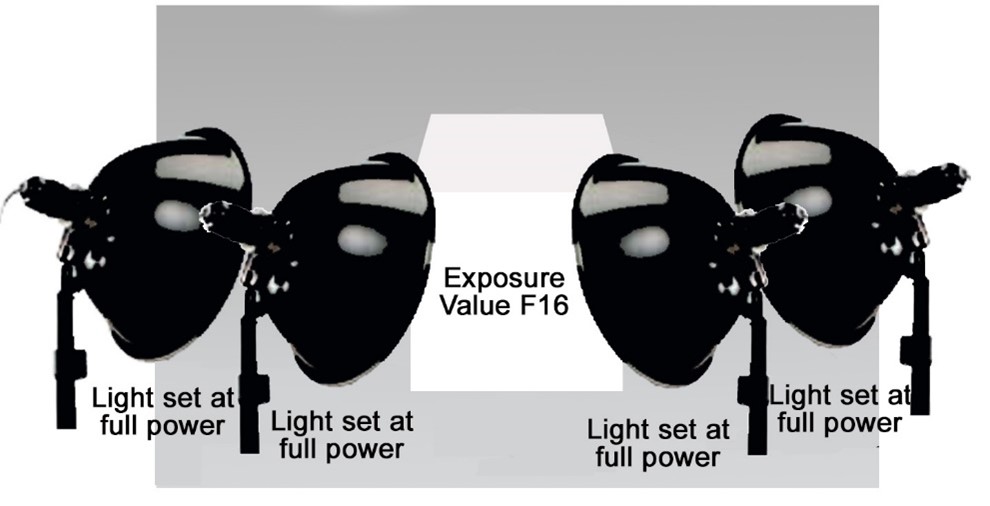
If you want to photograph that panel at f/16, you will now have to double the number of lights used to illuminate the panel to 4 (see above).
If you wanted to use f/22, you would need to double the number of lights on the panel to 8, and so on.
The amount of light on a subject increases as additional light is introduced.
Contrast
Now, let’s rotate that white box 45° so that the camera now sees two sides of the box, one side to the left and one side to the right.
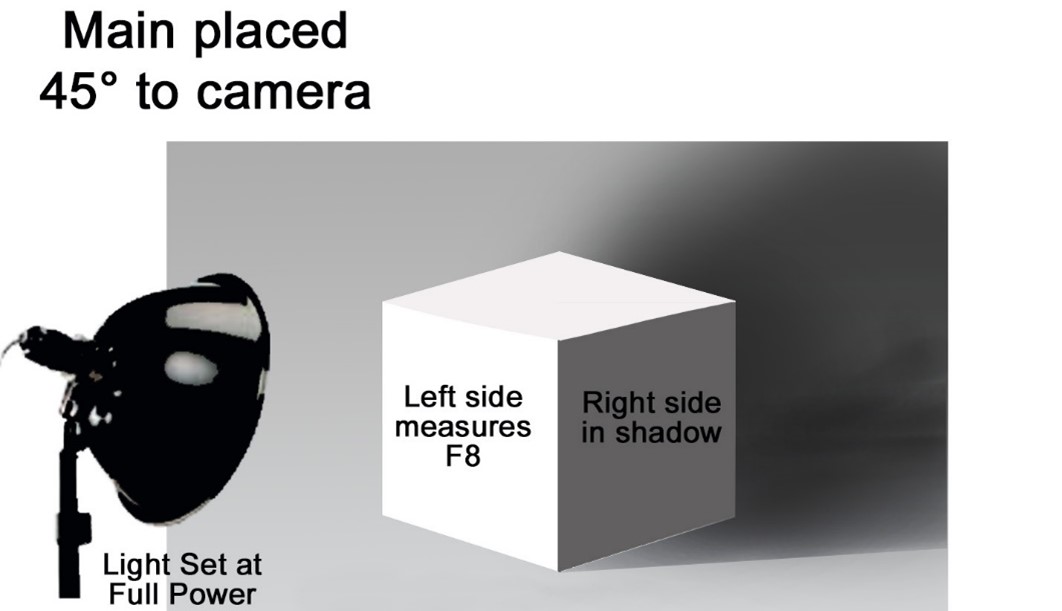
If we add one light to the left side, in such a way that the right side does not receive any direct illumination from the light, obviously, the lit side will be considerably brighter than the non-lit side. The difference between the illuminated side and the shadow side is known as contrast.

If you add a 2nd light to the left side, (above), the illuminated side gets even brighter and the shadow side appears much darker. This would represent an increase in contrast between the highlight side and the shadow side. The more light we add to the lighted side, the more the contrast is increased.
When it comes to portraiture, or lighting any other three-dimensional subject, the photographer must consider the contrast between the highlights and the shadows and determine when that contrast range is acceptable or desirable for the overall appearance of the subject.
For many lighting situations, the contrast is controlled by the photographer using one light as a main light to initially illuminate the subject and a second light or reflector which is introduced to brighten the shadows created by the main light. This second light is known as a fill light because it fills the shadows with additional illumination.
Contrast and Light Ratios
With our box example, we could place the main light to illuminate the left side and place our 2nd light so that it only illuminates the right side. If both lights are set identically to the same power, then the ratio of the lights are set at 1:1 (equal power) and the result of the light on the box is also 1:1 since there are equal amounts of light on both sides (see below).

When lighting is set in this manner, there is not really a fill light. Both act like main lights. Lights that are placed a 45° on both sides of the camera at equal power are said to be in a butterfly position. Each light should be measured separately to make sure they are set to equal output. Let’s say we measure each light at f8. The overall exposure in this set up would be f8 as the lights are independently illuminating the two distinct sides of the box.
This is a common light pattern that produces a flat light result because there is no contrast between the highlight and shadows because there are basically no shadows to begin with.

If we decrease the power of the right light by one stop (from f8 to f5.6), the left light (f8) is now twice as bright as the right light (f5.6). Remember, twice the amount of light represents one stop, so now my lights are set at 2:1 and the result on the box is also 2:1.
The light at full power on the left acts as the main light and would place the right side of the box in shadow, but because there is the light on the right side, it fills in the shadow created by the main and reduces the contrast.
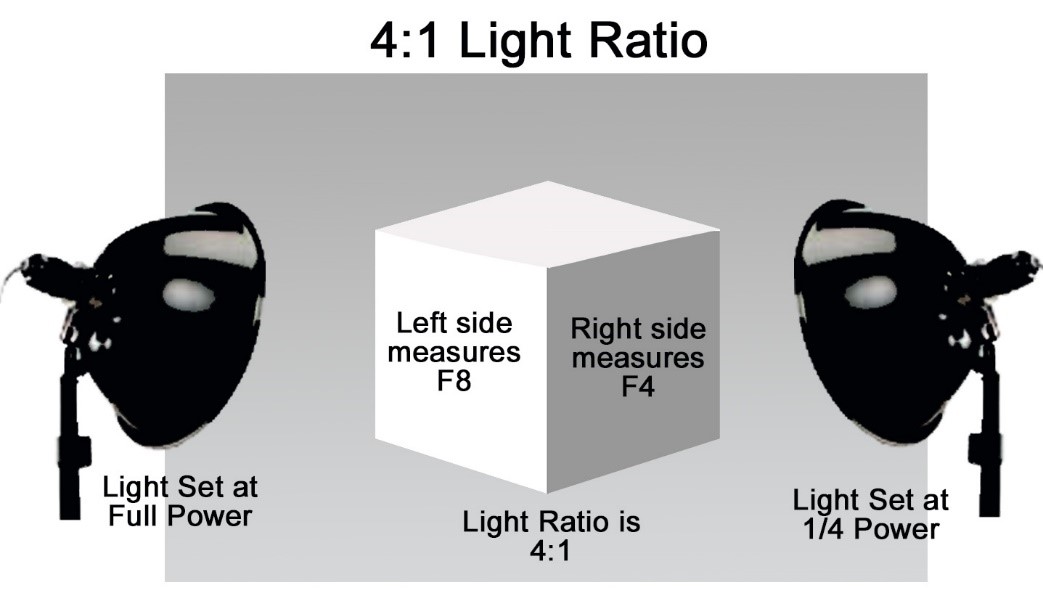
If we decrease the power of the right light by two stops (from f8 to f4), the left light (f8) is now four times as bright as the right light (f4). Remember, 4X the amount of light represents two stops, so now my lights are set at 4:1 and the result on the box is also 4:1. The contrast has increased compared to the 2:1 setting.
The placement of the two lights in the previous examples are in such a manner that neither one adds any light to the opposing side.
Layered Lighting
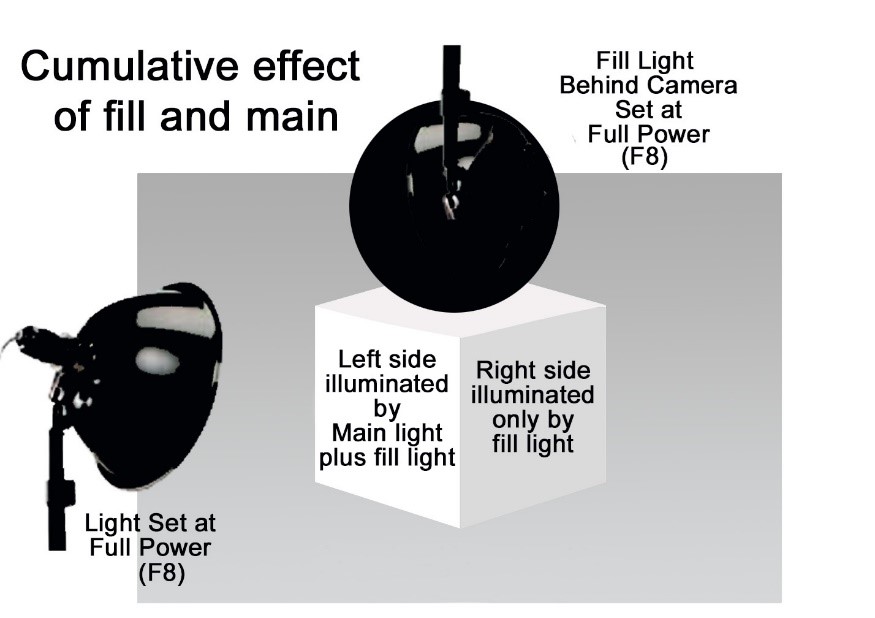
Something very interesting happens when we move one of the lights behind the camera so that it is allowed to add light to BOTH sides of the box.
Both sides of the box receive equal illumination with the light in this position. Notice in the example at right, each side measures f8 from the single light source placed behind the camera.
Adding a main light on the left only provides light to the left side, but the fill behind the camera adds light to the shadow side AND the highlight side.
We have already learned that lighting is cumulative, so when we add light to the highlight side, we have to account for the fact that the overall exposure on the highlight side has increased!
For example, if the main measures f/8 and the fill behind the camera also measures f/8, then the left side of the box receives the net effect of two lights, 2X as much (cumulative) and the right side only receives the effect of one light (see below).
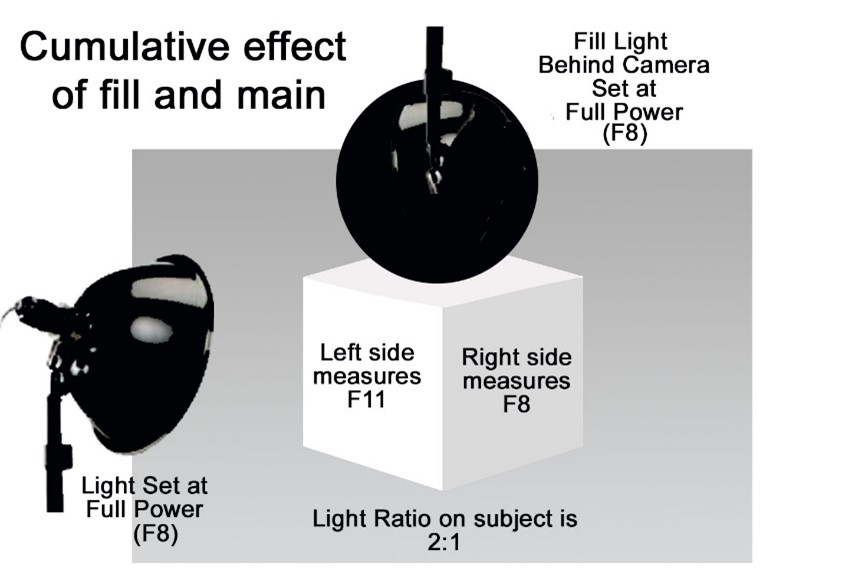
Since both lights measure f/8, the left side of the box would measure f/11 cumulatively and the right side would measure f/8 for a 2:1 ratio on the box - even though the lights are at equal power (1:1).
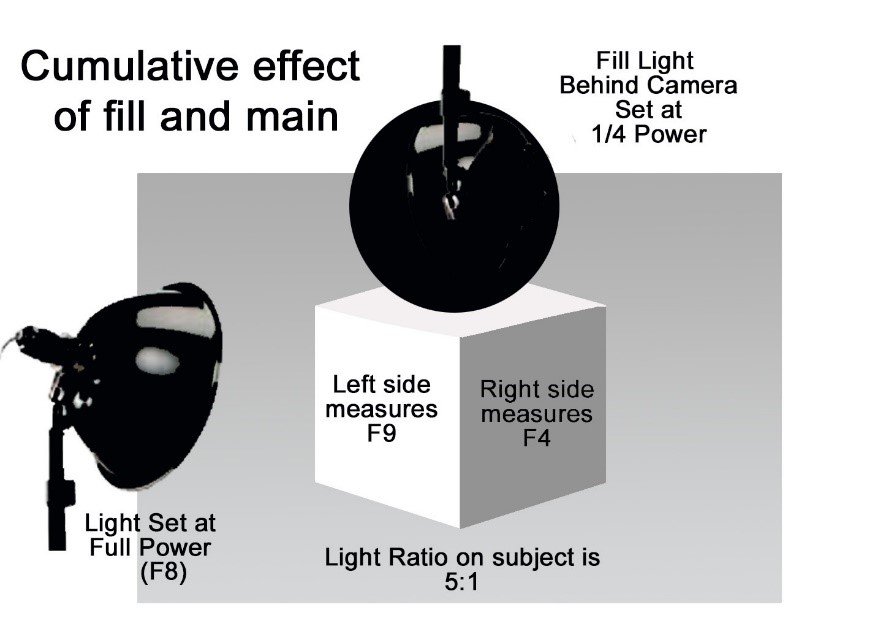
If we power down the fill by one stop to f5.6, then the highlight side accumulates all of the light from the main (f8) plus 1/2 stop of additional light from the fill for a cumulative total of f9.5 (f8.5 on the light meter set to measure in 1/10 stops).
The shadow side of the box only gets the lighting from the fill light (f5.6) set at 1/2 power of the main. So, the difference is that the left side is 3X brighter than the right. f/9.5 compared to f/5.6 or 3:1. Remember, the ratio at the subject is 3:1 even though the lights are set at a 2:1 ratio. (below)

The exposure is based on the overall reading of both lights on the highlight side which would be f/9.5 and that is how you would set the camera.
In a 3:1 ratio, the highlight side will always measure 1 ½ stops brighter than the fill.
You will need to recognize the half stop increments that exist between the whole stops.
If we power down the fill by two stops to f/4, the highlight side accumulates all of the light from the main (f/8) plus 1/4 stop of additional light from the fill (4x + 1/4) for a cumulative total of f/9 (f/8.3 on the light meter set to measure in 1/10th stops).
The shadow side of the box only gets the lighting from the fill light (f/4) set at 1/4 power of the main. So, the difference is that the left side is 5X brighter than the right. f/9 compared to f/4 or a 5:1 ratio. Remember, the ratio at the subject is 5:1 even though the lights are set at a 4:1 ratio.
In a 5:1 ratio, the highlight side will always measure 2 1/3 stops brighter than the fill.
Again, you will need to recognize the f-stops (1/3 stop increments) that exist between the whole stops.
Light gathered by the sensor is also cumulative. The longer the sensor is exposed to light, the more light is recorded by the sensor. This is why long exposures (30 - 60 seconds) of a landscape illuminated by a full moon will actually render the night scene to appear almost as broad daylight. The sensor just keeps gathering light until the shutter is closed, or it gathers so much light that it completely overexposes the scene and yields no detail.