Module 4B: Utilizing the Exposure Triangle to Create Images
B. Utilizing the Exposure Triangle to Create Images
The Sunny 16 Rule
The Sunny 16 Rule is less of a rule and more of a guide to help you quickly determine your f/stop and shutter speed in various outdoor lighting conditions.
Every situation that you encounter has a measurable amount of light to work with, and with the help of a meter, it is easy to measure the exact amount of light for specific situations. The Sunny 16 Rule can help you learn to estimate the amount of light without the help of the meter.
When working under daylight conditions only, there is a formula that makes calculating the exposure quite easy. We are looking for a starting exposure and this chart makes it simple to memorize. The formula is called the Sunny 16 Rule and looks like this:
Lighting Pattern / Starting Exposure
Sunny / f/16 @ 1/ISO
Partly Cloudy / f/11 @ 1/ISO
Overcast / f/8 @ 1/ISO
Heavy Overcast / f/5.6 @ 1/ISO
For each of the lighting conditions, the f-stop is given. The shutter speed will be decided by the ISO that is being used.
For example, if it’s a sunny day, and you are using 100 ISO, the starting exposure would be f/16 at 1/125.
(1/125 is the closest shutter speed to 100 ISO.)
If you are using 400 ISO, the closest shutter speed will be 1/500, so your starting exposure would be f/16 at 1/500.
Once you have determined the starting exposure, then you can go through the equivalent exposure process we learned earlier, to determine the equivalent exposure you might wish to use, depending on the effect you want.
Example 1
On a heavy overcast day using 400 ISO, the exposure would be
f/5.6 @ 1/500.
You might want an increased DOF, so try
f/8 @ 1/250
or
f/11 @ 1/125
or
f/16 @ 1/60
All of these exposures will work, but f/16 will give you the most DOF. You can even go to f/22 at 1/30 but remember 1/30 may be too slow to hand-hold the camera without noticeable camera shake.
Example 2
This time we find ourselves on a sunny day with 100 ISO. The starting exposure will be
f/16 at 125. We want to freeze kids who are riding bicycles, so they appear sharp.
f/11 @ 1/250
f/8 @ 1/500
or
f/5.6 @ 1/1000.
f/5.6 at 1/1000 will be the sharpest of the choices.
Exposure Compensation
Shooting the camera in manual mode is the ultimate exposure compensation. When exposure readings are taken with an incident light meter, there is no need for exposure compensation because the reading is an accurate reading.
Exposure compensation may very well be required for cameras which are used in Program, Aperture Priority or Shutter Speed Priority modes. Again, this is because the camera averages the exposure of the entire scene.
Most cameras can allow the user to override the camera’s choice of exposure and reduce or increase the exposure settings by up to two or three stops and in 1/2 or 1/3 stop increments.

Exposure compensation using -1 or -2 reduces the average exposure by one and two stops respectively. Settings such as +1 and +2 increase the exposure by one or two stops.
The image below shows a camera with -.3 (1/3 stop) exposure reduction.

Check your manual to find out how to set the exposure compensation function on your camera.
Overexposure
Overexposure of a subject happens when the overall tones of the scene are dark, and the subject is lit. Stage presentations with dark backgrounds or spotlighted performers against a dark background are great examples.
The camera sees mostly dark values, so it averages the exposure of the darkness which lightens the dark tones but lightens the subject as well washing out all of the detail in the subject. Setting the camera’s exposure compensation to -2 tells the camera to use an exposure that is two stops less than the average exposure. Hopefully, this will be enough to keep the subject closer to the actual value of the lighting on the subject.

In the above image, the dark sky, the water, and the dimly lit hotel caused the camera to overexpose the brightly lit water features.
In the below image, you can see that there is detail in the fountain water. The exposure compensation was set to -1.3.

Underexposure
Typical situations which create underexposure on the subject occur when the background is lighter than the subject. A subject in a scene with a lot of sky or a subject indoors with a lot of windows revealing outdoor exposures are good examples.
The camera will read the bright light and average the exposure which causes the subject to be dark. Setting the exposure compensation to +1 or +2 may be just enough to render a properly exposed subject. The background may wash out or be somewhat overexposed, but the subject will be closer to the proper exposure.

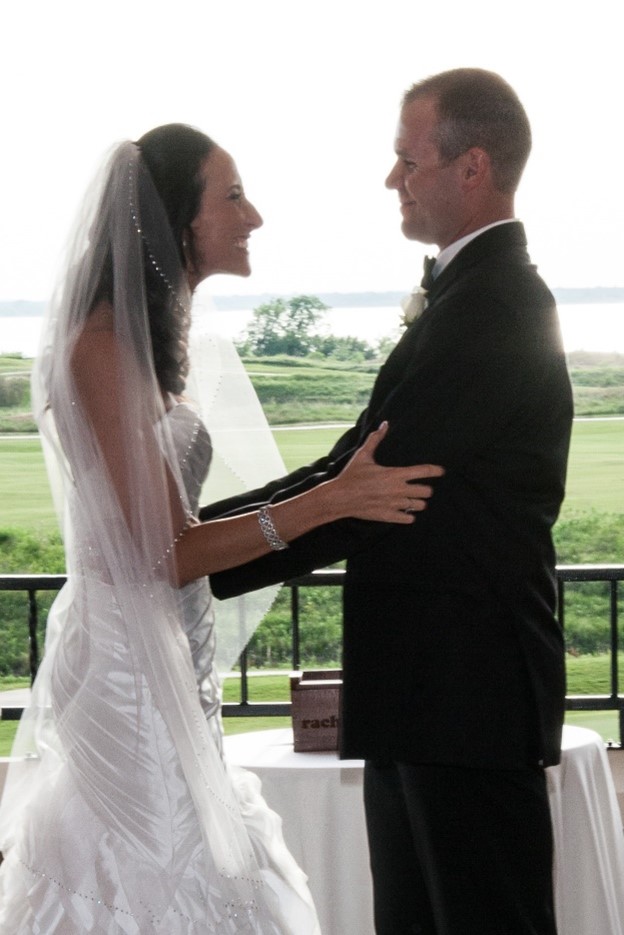
IIn the image on the left, the couple appears underexposed becuase the