Module 4C: Using a Light Meter
 C. Using a Light Meter
Light Meters
When it comes to measuring the intensity of light, there are two types of meters a photographer will use: a reflective meter or an incident meter. While both meters measure light, they operate in completely different ways.
The one thing the meters do have in common is the fact that both of them are calibrated to render a tonal value of Middle Gray, also known as 18% Gray. Think of this gray value as the midpoint between black and white.
For a meter to return a useful measurement of the intensity of light, the photographer will need to provide the meter with a working ISO value. The meter will then return a measurement of light by providing a corresponding f-stop and/or shutter speed for that ISO value.
When activating the in-camera meter, the display will vary depending on what mode is selected.
In Program Mode, the camera is allowed to select the f-stop and shutter speed for the given ISO value. Assuming an adequate ISO value is selected, the graph will always be centered as the camera is returning an exposure based on the average of the light reflecting from the scene.
In Aperture Priority Mode, the graph is always centered because the camera is selecting the corresponding shutter speed for the chosen f-stop and ISO value.
In Shutter Speed Priority Mode, the graph is always centered because the camera is selecting the corresponding f-stop for the chosen shutter speed and ISO value.
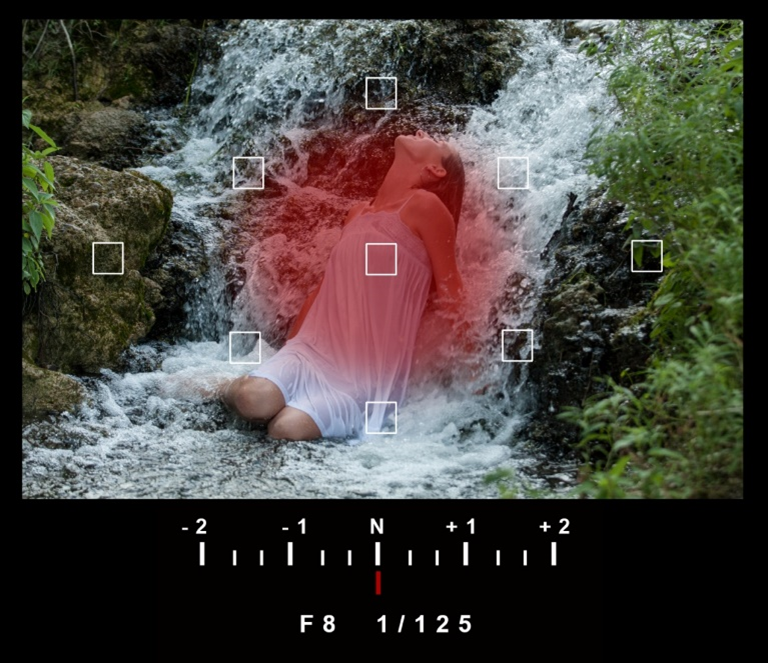
In Manual Mode, the graph will only center when the photographer manipulates the f-stop and/or shutter speed dials to find a pair of settings that correspond to the amount of light reflecting from the scene at the given ISO value.
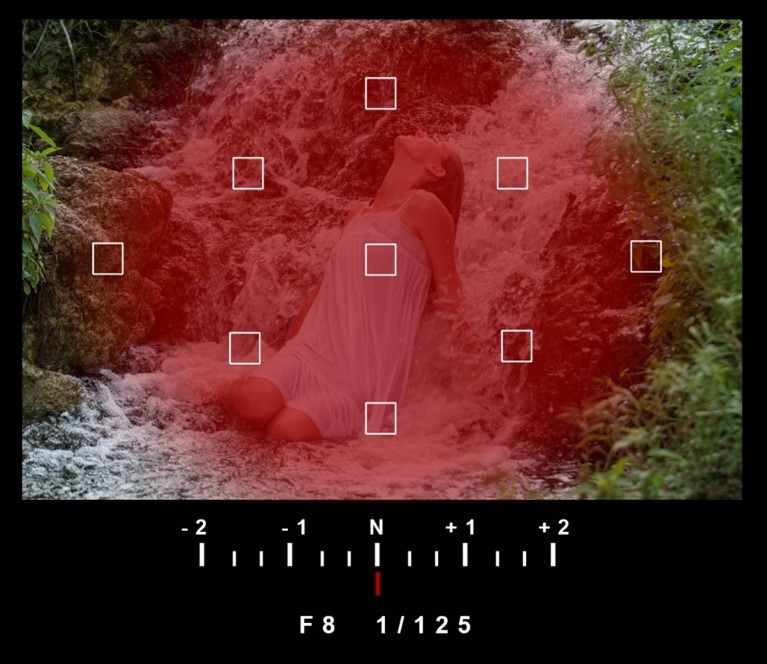
When viewing the graph in manual mode, if the indicator line is to the minus side of the center, the meter indicates underexposure. The photographer will either need to select a larger lens opening or slow the shutter down, or a combination of the two in to get the graph to the center.
If the indicator line is to the plus side, the meter indicates over exposure and the photographer will need to make the lens opening smaller and/or increase the shutter speed to move the graph to the center.
In the event a suitable f-stop and shutter speed pair can’t be found to center the graph, the photographer will need to increase or decrease the ISO value accordingly.
Keep in mind, when the graph is centered, this does not necessarily reflect the proper exposure of the subject. It simply provides an averaged reading of the light reflecting in the scene.
Understanding the In-Camera Meter
The following examples illustrate various graph readings:
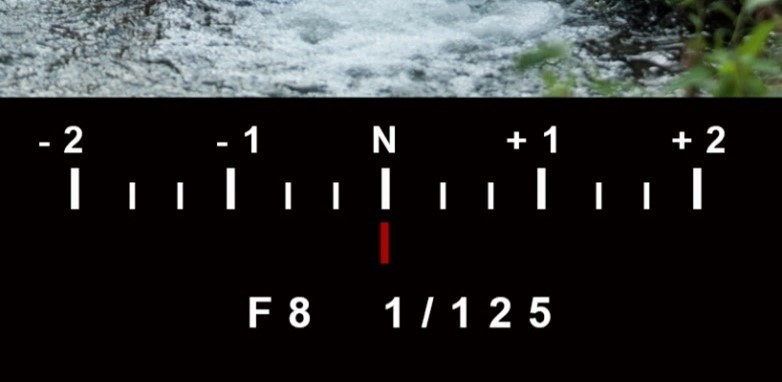
Average Exposure (18% Gray)

One Stop Overexposed
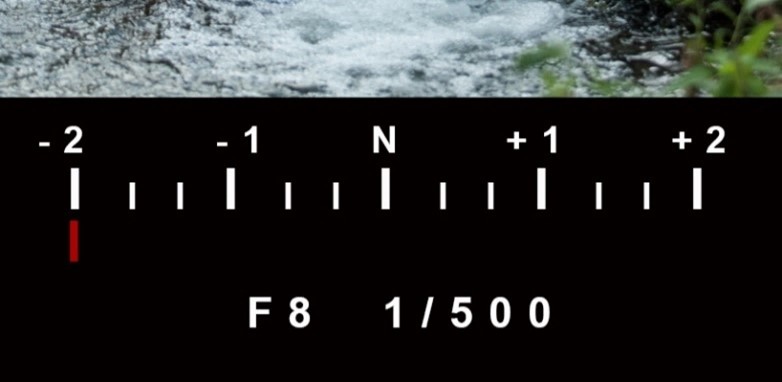
Two Stops Underexposed
Metering Modes
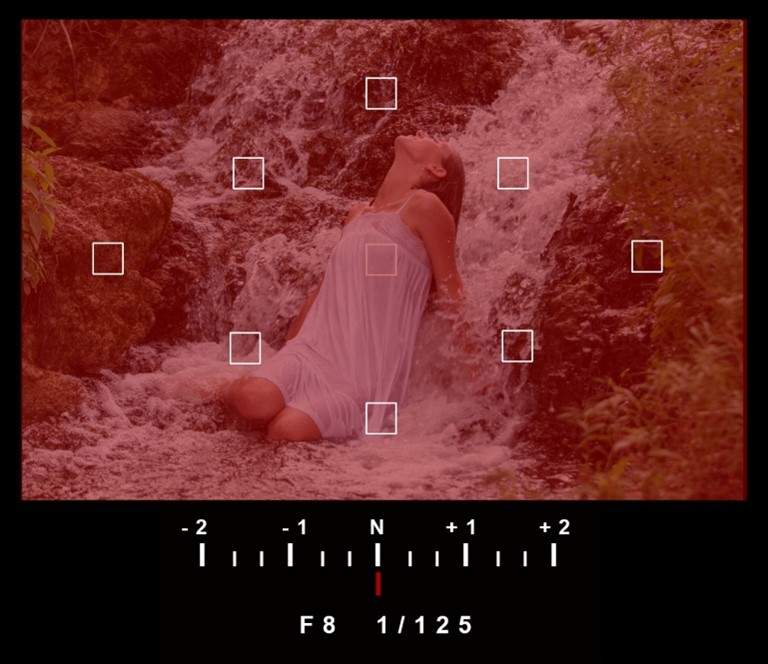
Most cameras allow the photographer to select a variety of metering modes that restrict or expand the area in the viewfinder that is used to determine the exposure.
These modes may include options that allow the entire viewfinder area to determine the average exposure of the scene. Additional modes will limit the area within the viewfinder that is used to determine the average exposure from a smaller sampling of the scene or subject.
Spot Metering
The smallest of the camera metering modes is known as spot metering. A spot meter drastically narrows down the area of the scene or subject it will read to render the exposure result. Some spot meters will narrow the coverage from a 1° to around 3° angle of view.
You may also find reflective spot meters in some hand-held meters.
Camera Meter Modes
![]()
Evaluative Mode Weighted
![]()
Center
(Matrix)
![]()
Partial Mode
![]()
Spot Meter

Measuring Ambient Light
We have learned that a reflective meter measures the light reflecting from the subject or scene. A reflective meter does NOT measure the amount of light that is illuminating the subject; it only measures the amount of light reflecting from the subject or scene.
You should not rely on this reading as a proper exposure. First, the reading from the camera meter is an average of all reflected light. Secondly, meter reading varies with the reflectivity of the subject.
If you set up a light to illuminate a white mat board and use a reflective meter to measure the light, you will get a different meter reading than if you use a black mat board and the exact same light. Two different exposures with no change in the light because you are measuring the light REFLECTING off the two mat boards with our REFLECTIVE meter and white reflects more light than black.
If you were to take individual photos of the two mat boards using the exposures provided by the reflective meter, the result might surprise you! BOTH images will look identical...18% GRAY.

This happens because the meter is designed to average the reflected light reaching the meter and provide an average of all those tones to render an 18% gray result.
The meter inside your camera is a reflective meter! This meter drives all of the exposure decisions that are made by the camera while in Program, Aperture Priority, Shutter Speed Priority and Auto ISO modes.
When you point your camera toward a scene, the meter has no idea if it is looking at trees, grass, the sky, a bride, the sun or the moon. It only knows that there is light reflecting from all sorts of sources throughout the entire scene and its only job is to find the average of all those dark sources, bright sources and all those mid-tone values and give you the average.
When you point the camera toward a white card, it does not know if it is white or black, but it does know its job is to deliver 18% GRAY. When you point the camera towards a black card, again, it does not know if it is white or black, but it does know to deliver 18%GRAY. That is why a black card and a white card BOTH turn out gray using a reflective meter.
A reflective meter requires a high degree of interpretation. If you are photographing a bride in her white dress on a sandy beach in the middle of the day, chances are your camera meter is turning your bride gray. You will have to figure out how to interpret what that meter is doing to you.
You may also elect to use a hand-held reflective meter, but the way it interprets the result is the same as your camera meter.
Many photographers use spot metering mode assuming this provides an accurate exposure. Spot metering is still a reflective meter. If you point the spot meter to white, you will get gray. If you point it to black, you still get gray. The best hope is to find an area in the scene that reflects an 18% gray value.
A reflective meter requires a high degree of interpretation. If you are photographing a bride in her white dress on a sandy beach in the middle of the day, chances are your camera meter is turning your bride gray. You will have to figure out how to interpret what that meter is doing to you.
18% Gray Card
An 18% gray card or target is a calibrated measurement tool that reflects 18 percent of the light that reaches it. Light reflected from a gray card is measured with a reflective meter to provide an accurate exposure.

By introducing an 18% gray card into a scene in such a way that it is placed in the same lighting as your main subject, you can take a meter reading from your camera meter, or any reflective meter and you will have a perfect exposure for that subject in that lighting. Using the f-stop and shutter speed provided by the meter while using a gray card will ensure white will be white, black will be black and all other tonal values will fall into place.
You can also use a Gray Card in the same way to set your custom white balance.

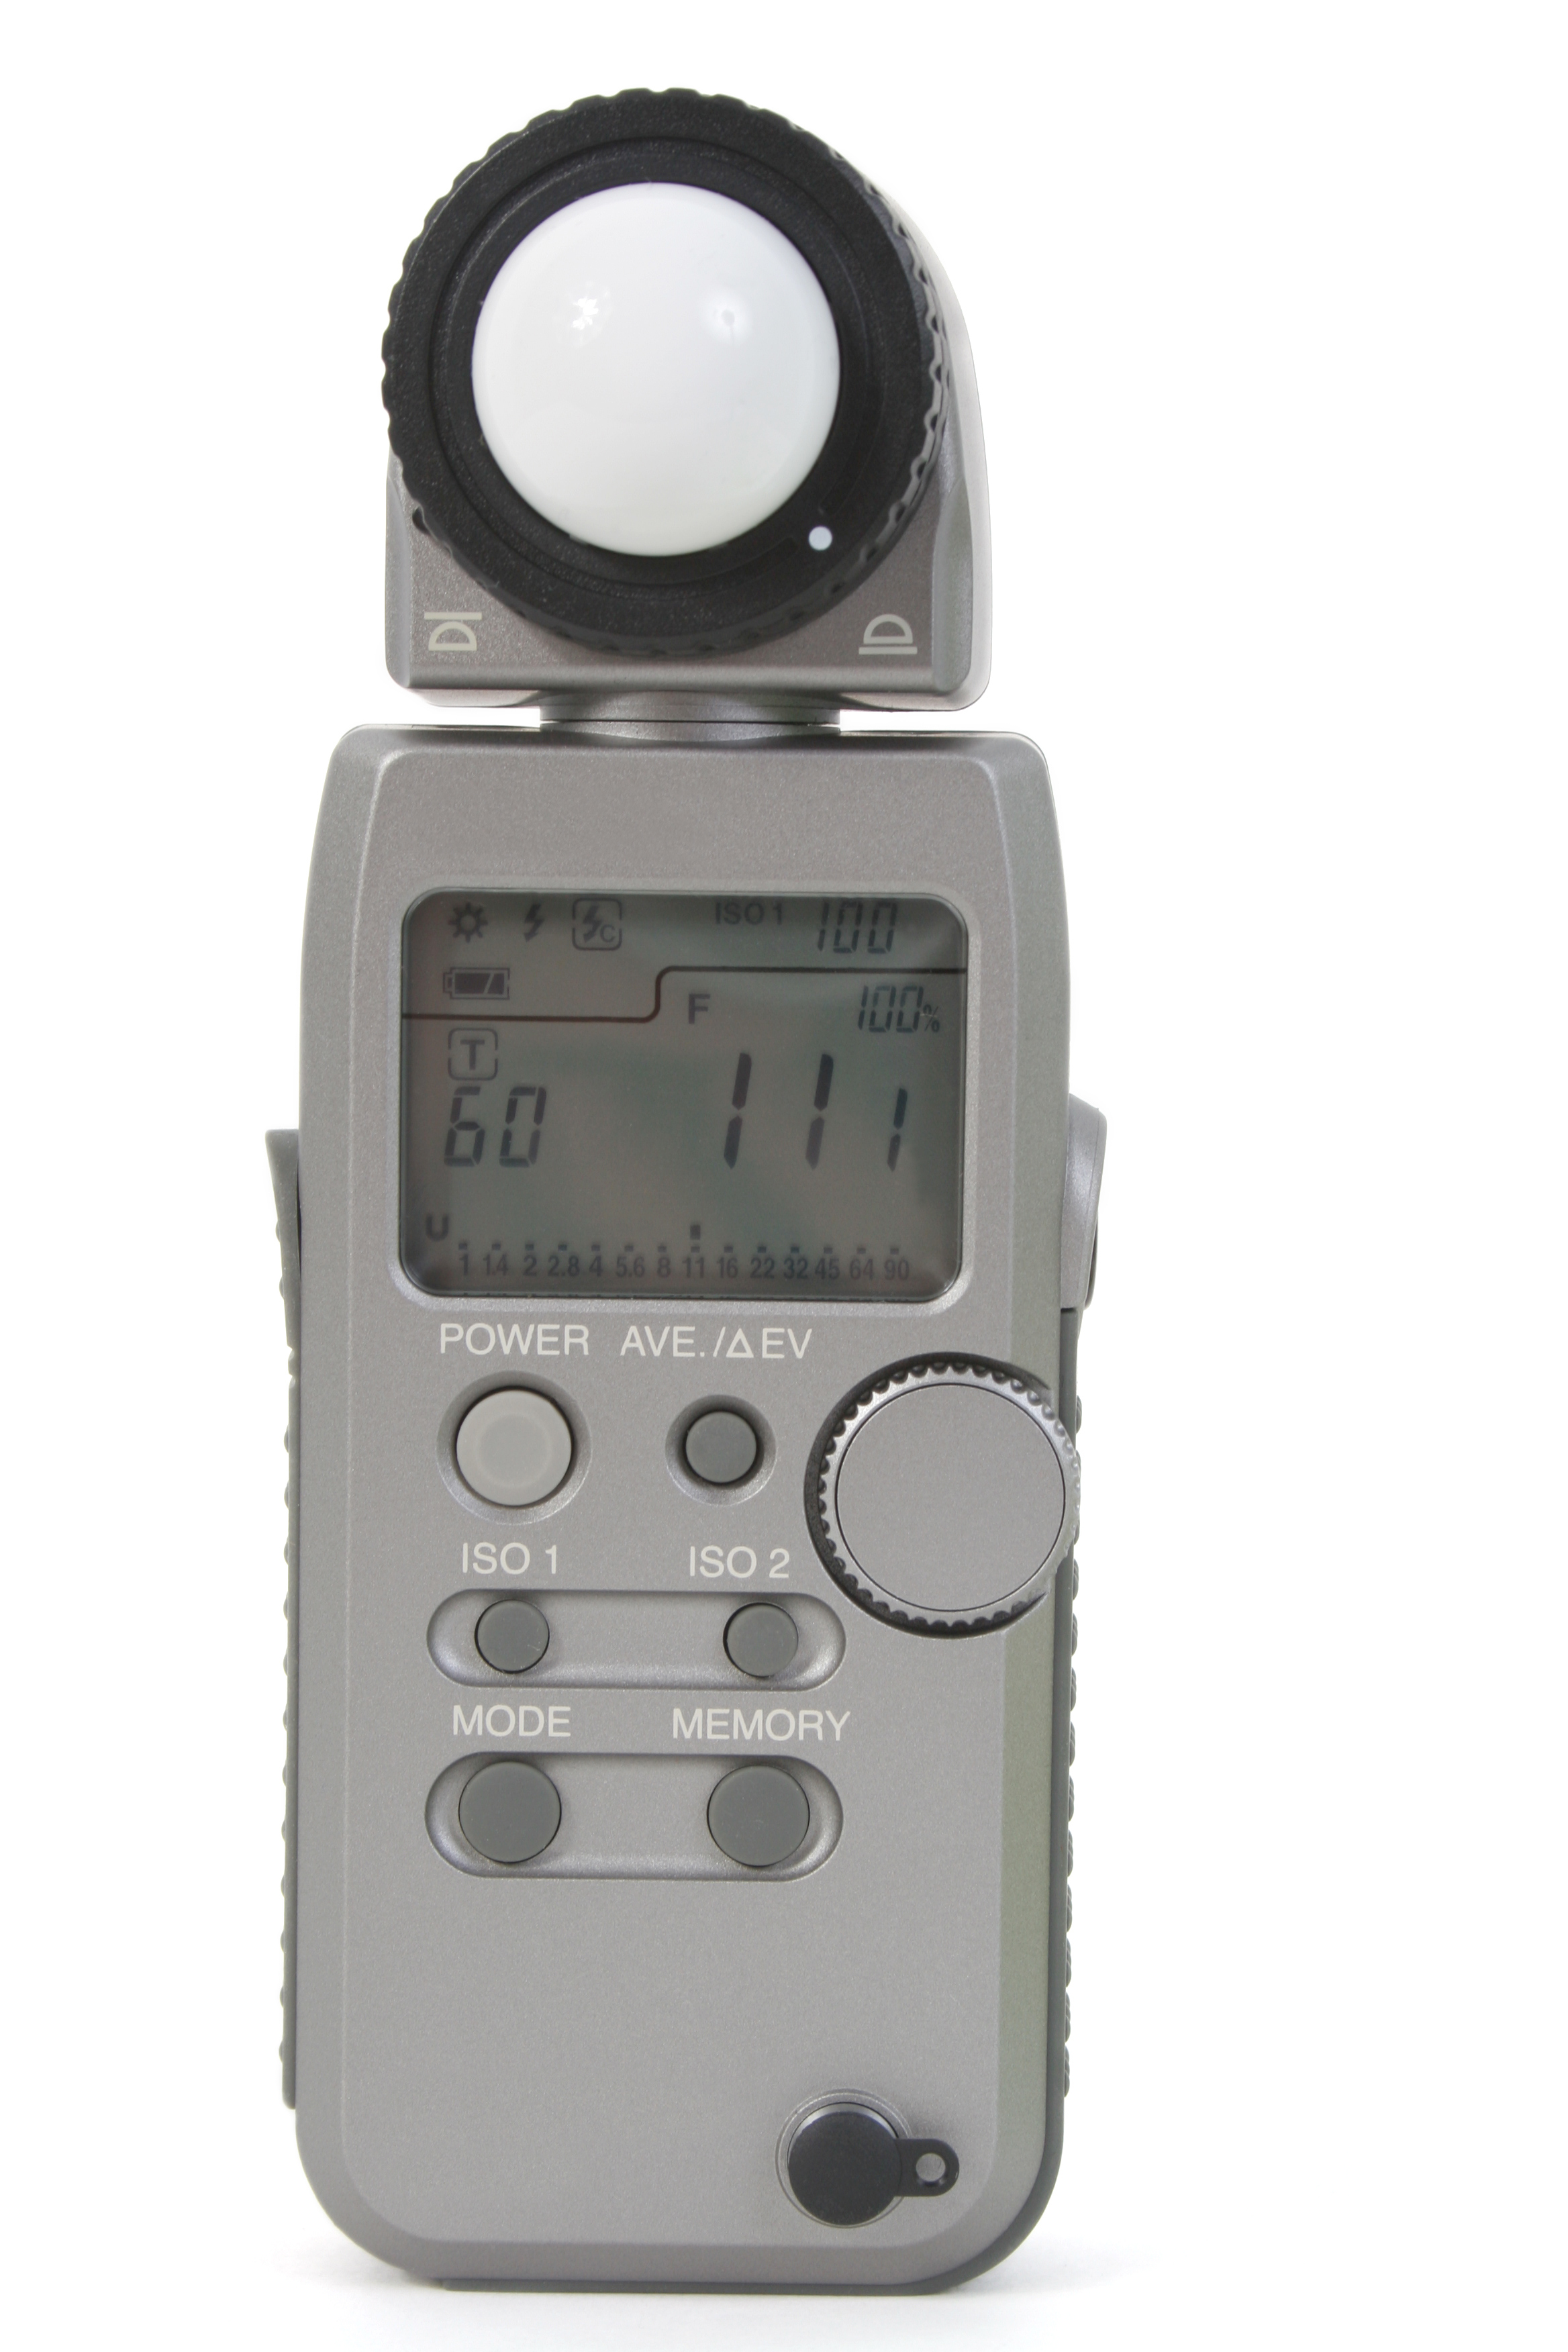
Incident Meter
Where a reflective meter measures the light reflecting from the subject, an incident meter measures the amount of ambient light falling on the subject. That is an important distinction, because now we have a meter that does not care what is behind it, it only cares about the light that is falling on the dome or disc of the meter when providing a result.
To use this meter, simply place it near the subject and point the dome toward the light source so that the meter is at the same distance from the light source as the subject. Because it is measuring the light falling on the forward-facing dome, it is not influenced by the color or the tonal values of anything behind it.

The result that is provided by the incident meter is still an 18% result, but it is the result of the measurement of the ambient (constant) light and not the reflected light. Setting your camera to this reading will render all the tonal values accurately.
The reading from the incident meter measuring the light falling on the subject will be exactly the same as the reading from the reflective meter measuring a gray card in that same light.
In addition to measuring ambient light, many incident meters are also capable of measuring studio flash or portable strobes.
Measuring Ambient Light
Light meters require input from the user in order to render an acceptable result. First, set the meter to ambient mode. Next, input the ISO that you will be using on your camera during the exposures. Once that is set, then you have the option to select a preferred f-stop or a preferred shutter speed. Once you have made your choice, the meter will provide you with the corresponding shutter speed if you chose the f-stop, or the corresponding f-stop if you chose the shutter speed.
Once the reading has been taken, you can quickly scroll through all of the equivalent exposures to see all of the combinations of f-stops and shutter speeds that can be used under those particular lighting conditions.
Which Meter Should You Use?
Reflective - In camera, this meter produces average results. Its usefulness is really dependent on your ability to interpret the scene.
Spot - Particularly useful for landscape and wildlife photography where up-close metering with an incident meter is impractical or impossible. Meter readings with a spot meter can be done at long distances because of its narrow angle of view.
Incident - Ideal for portraits where the light can be measured at the subject position. Also ideal for studio lighting with hot lights or cool lights. A must for measuring any flash exposure.
Measuring Flash
Many hand-held incident meters offer both ambient light and flash capabilities. When measuring flash exposures, set the meter to Flash mode. This is usually indicated by a lightning bolt icon.
Some meters also provide modes for connecting the meter to the flash by a cord (lightning bolt w/C) and possibly a mode for firing a flash wirelessly through a built-in or optional transmitter (lightning bolt w/T).
Input the desired ISO and select a shutter speed. Most of the time, 1/125 is used, but there are situations where a faster speed may be selected to avoid any bright ambient light that might influence the meter’s reading. Once activated, the meter will provide an f-stop read out.
Interpreting Light Meter Readings
As we have already seen, interpreting the light meter readings is a must for reflective meters and spot meters. There is also some degree of interpretation that must be done with an incident meter as well. While the incident meter does measure the light falling on the subject, that reading does not necessarily provide you with any exposure information from the shadows that may be present in the scene.
Interpreting Light and Shadow
When taking the overall reading of the light illuminating the subject, direct the dome on the incident meter toward the light source. If multiple light sources are used, place the meter in front of the subject and direct the dome toward the camera.
But, what if you want to know the exposure difference between the highlights and the shadows? Most techniques employ the use of a flat disc on the meter when taking comparison readings from separate light sources or readings of highlight and shadows.
If the difference between the two readings is not acceptable and too far apart, the photographer may elect to add some supplemental lighting or “fill” light to raise the value of the shadow side thus bringing the two values closer together. This difference (Light Ratio) is a personal preference for each photographer.
Interpreting the Read-out of the Meter
The meter itself may also require some degree of interpretation of the reading. Many meters can be programmed to take measurements within 1/10 of a stop. This provides the photographer with very accurate readings, but these 1/10th measurements cannot be overlooked. If your meter is set to measure in 1/10ths, you have to interpret the 1/10th reading for your final exposure!exposure.
For example: The read out on thea meter at left is f5.63 at 1/125.125. That means the f-stop is f5.6 and 3 tenths.3/10. While our cameras don’tdo not provide f-stops in 1/10 increments, most cameras have the capability of setting it to show 1/3 or 1/2 stop increments.
If weTo carry out this exposure, wethe photographer would select f6.3 if our camera is set up in 1/3 stop increments or we may choose to “round up”up to f6.7 (sometimes called, “f5.6 and a half”)half) if ourthe camera is in 1/2 stop increments.
These are decisions you want to be familiar with as you look at your meter readings paying close attention to that 1/10th reading. If you are not careful, you may glance at f8.09 and carelessly use f8 when, in fact, the reading is a mere 1/10th of a stop from being f11.
The table below shows corresponding f-stops for a meter that is set to read in 1/10 stop increments.