Module 2B: Properties and Quality of Light
 B. Properties and Quality of light
Quality of Light
In the process of evaluating the light from natural and artificial light sources, the photographer also considers the quality of light. This includes the characteristics of hard light (specular) and soft light (diffused) but also the inherent color value of the light.
The Color of Light
The electromagnetic radiation spectrum includes a very small section that is visible to the human eye. This is known as the visible light spectrum. Visible light has varying wavelengths which determine how we see its color.
White light contains all of these wavelengths. Passing white light through a prism separates the light waves across the visible spectrum - simply put, a rainbow of color.
Refer to the abbreviation ROY G BIV. This mnemonic device helps us remember the order in which these light rays manifest themselves when white light is passed through the prism: Red, Orange, Yellow, Green, Blue, Indigo and Violet.
Color Temperature
Color temperatures describe the color values throughout the visible spectrum with a numeric value based on the Kelvin Color Temperature Scale. Color has a numerical value that can be expressed in degrees Kelvin or K°.

White Light
Take another look at ROY G BIV. If you think about the initials of Roy, you get R.G.B. (Red, Green, Blue). This helps us to remember that our cameras reproduce colors by adding values of red, green, and blue.
White light is the basis for the natural color we perceive in daytime sunlight. Daylight is White Light. We generally accept that it is measured as 5500 K°. On a camera’s white balance settings, daylight is represented by the sun icon.
The perception of color is the result of light reflecting off of a surface. Under white light conditions (5500 K°), color is how our eye interprets it; a white sheet of paper is white.
So, what happens when we view color under conditions other than white light?
Color Shifts
Every source of light has its own color. These color values range from the very warm tones at 1000K (candlelight) upward to the very cool tones at 10000K (shade).
Because the perception of color is the result of light reflecting off a surface or a subject and because every source of light has its own color, photographers have to be aware of how a light’s color value in K° will impact the recorded color values of a scene.
If 5500K represents daylight/white light and we have a light source that is measured at 2800K, it is going to be a much warmer color of light. In this case, white is no longer truly white, but will appear more orange or yellow. Our brains attempt to trick us and think that if a white sheet of paper is white, we should always interpret it as white under almost all lighting conditions. We are simply programmed to see the colors as we know them.
Cameras do not have a brain to trick them. They simply record the color values of the reflected light coming from the scene. When we look at a photograph of a white sheet of paper that has been photographed under a 2800K light source and the camera’s white balance icon is set to the sun, the paper appears orange or yellow.
For that sheet of paper to appear white in the photograph, the photographer would have to recognize that the light source was 2800K and move the white balance setting from the sun to the light bulb icon which represents warm tungsten light. A camera that offers a Kelvin option could be set to the “K” setting and then dialed to 2800 in the camera’s white balance menu.
Photographers must deal with color shifts from all artificial light sources and from changes of the sun’s position. Color temperatures may range from 1,000 to 10,000.
A camera that offers the Kelvin option for white balance usually covers from 2200K to 10000K in 100° increments. If you add all those up, the Kelvin options provide the photographer with 79 distinctive white balance options.
The white balance icons represent only one of these 79 values for each icon. Since there are only 6 icons that represent a single setting, the camera can only get in the ballpark using these icons. The K setting clearly offers the opportunity for much more accuracy.
Accurate Color
There are plenty of reasons to record accurate color of any given scene or subject. Accurate color is often a priority for commercial photography. It could also be a priority for a bride who is wearing an off-white dress and desires her images to reflect this subtle hint of warmth to her dress.

There are times, however, when the photographer may wish to impose deliberate shifts to accurate color. A photographer may prefer slightly warmer skin tones for example. Perhaps a photographer would prefer slightly cooler/bluer tones in a snow scene to represent that it is cold or overly warm/red tones of a summer scene to emphasize the heat. These deliberate shifts in color are part of a photographer’s prerogative when it comes to capturing images.

Properties of Light
Properties of light include a look into some of the physics of light.
Angle of Incidence
If you throw a rubber ball straight into a wall, you can predict that the ball is going to come right back at you. If you throw that same ball into the wall at a 45° angle, it will bounce off the wall in the opposite direction and at the exact angle you threw it. The angle of incidence equals the angle of reflectance. Light travels in the same course that the ball does.
If you photograph a mirror straight on with a flash on the camera, you are going to see the resulting burst of flash in that mirror because the light bounces straight back to you just like the ball. However, if you take a few steps to the side and photograph that same mirror with the same flash, the reflection of the flash comes off the mirror at the opposite direction and at the same angle.
This principle recognizes the path that light travels relative to a normal path. For photographers, normal is the line created between the camera position and the subject. If you are behind the camera, facing your subject, and the main light is exactly behind you, the angle of incidence is 0°. Move the light so that it is at 45°, the angle of incidence is now 45° and the angle of reflectance is also 45°.
Light bounced off of a highly reflective surface returns the light more efficiently than dull or matte surfaces. Glossy surfaces reflect more light than rough surfaces.
Lighting that is reflected or bounced off of a surface will also take on the color of that surface.
Size of the Light
The size of the light source relative to the subject determines its relative hardness or softness. It also impacts the size and intensity of highlights and the hardness or softness of the shadows.
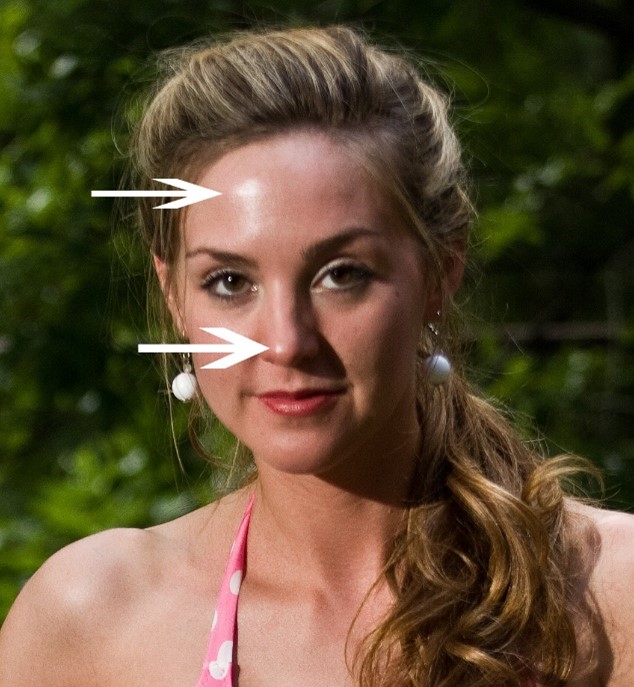
Smaller light sources tend to create specular highlights and harder transitions between highlight and shadow.
Larger light sources tend to create diffused highlights and softer transitions between highlight and shadow.
The small portable flash created strong specular highlights on her forehead and down the bridge of her nose and a small highlight at the tip of her nose.
The transition of the highlight and shadow on her nose and cheek is very abrupt.
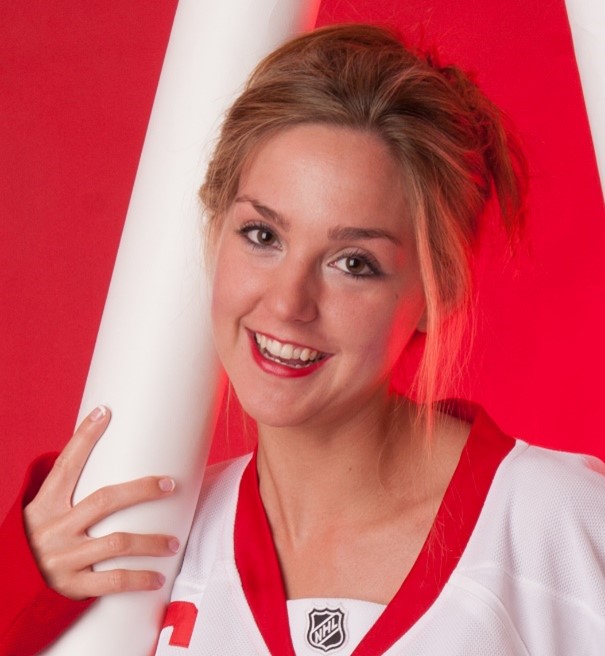
The image below was done in the studio with a softbox.
The large light source created a diffused highlight on her forehead and nose and a much more gradual transition of highlight and shadows on her nose and cheek.
The Inverse Square Law
This law of physics states that “the intensity of the light on a subject is inversely proportional to the square of the distance of the subject from the light source.”
In simple terms, it tells us that at any given distance if we double that distance, we lose two stops of light.
For example, a light that measures F11 at 10 feet, will measure F5.6 at 20 feet.
(The math looks like this: The distance is doubled (2X). The inverse of 2 is 1/2. 1/22=1/4)
The output of the light at ten feet was F11. At twenty feet, it is now 1/4 (two stops) the intensity that it was at 10 feet.
Conversely, if we take any given distance and then cut it in half, we gain two stops of light. For example, if the light measures F11 at ten feet, it will measure F22 at five feet (a two-stop gain).
(The math looks like this: Distance is cut in half (1/2X). The inverse of 1/2 is 2. 22 = 4) Now, at five feet, the light is 4X brighter (two stops) than it was at ten feet.
This is true for any exposure at any given distance.

Depth of Light
One of the takeaways from the Inverse Square Law is that light falls off more rapidly at close distances than it does at further distances. The depth of light describes the consistency of the exposure from the point of the subject and the rate at which it falls off.
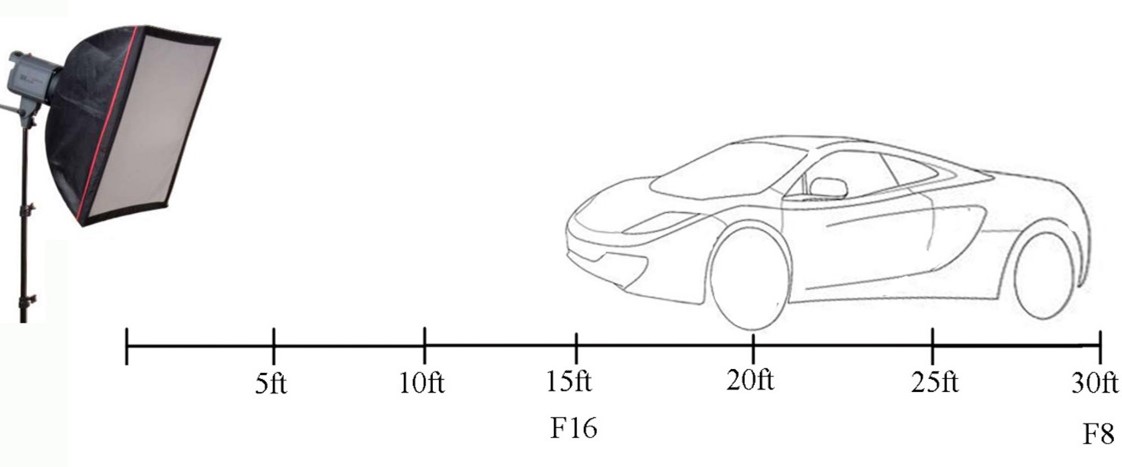
This comes into play when a photographer is trying to light a subject or subjects and control how quickly the light falls off. For example, assume you are photographing a car from the front bumper to the rear. The car is 15 feet long. A large soft box is placed 5 feet from the front of the car.
If the light at the front bumper measures F16, then the light falls off to F8 near the windshield and measures F4 at the rear of the car. The light falls off rapidly (4 stops) because the light source is rather close to the front subject.

If the light is moved back to 15 feet from the front bumper and is powered up to read F16 at the front of the car, the rear of the car is only two stops less than the front of the car.
Now, consider lighting a subject from the front near the camera perspective. The same effect happens as the light falls off in the background. The further the light is from the subject, the slower it is to fall off. The closer the light is to the subject, the quicker it falls off. This effect is seen in the images below.


Regardless of the type of light that is being used to illuminate a subject or a scene, a photographer must consider both the quantity of light and the quality of light.
Quantity of Light
Exposure of an image is based on the quantity of light that is present on the subject and within the scene. The quantity of light is measurable with a light meter.
Photographers generally create exposures based on the lighting that illuminates the subject. Using this measurement as the basis for the exposure, the photographer will then evaluate the entire scene to determine other important considerations such as:
· The best angle to use
· How other light present in the scene might impact the image
· The exposure values of the shadows
· The intensity of the lighting in the background
· The impact of including the sky in the image
These observations determine whether or not the photographer might wish to:
· Introduce additional supplemental lighting
· Find ways to block unwanted light
· Find ways to redirect the light
· Introduce an artificial main source of light
· Scrap the selected scene entirely
While most images base the exposure by the lighting on the subject, this is not always the case. Photographers may elect to create images to interpret a scene based on exposure values of other elements in the image. An example of this would be placing the subject in silhouette and basing the exposure on the light values of the sky and not the subject.
While proper exposure is a science, it is also an art and open to a lot of interpretation by the photographer.
Quality of Light
In evaluating the light from natural or artificial light sources, the photographer also considers the quality of light. This includes the characteristics of hard light (specular, high contrast) vs soft light (diffused), but also the inherent color of the light.

The image above is an example of hard lighting from direct sun.
The sharply defined shadows are the result of a hard light source.
The smaller the light source relative to the subject, the harder the light it will produce.
Of course, the sun is really quite large, but relative to the subject, it is a tiny orb in the sky.
When clouds move in and cover the sun, the sunlight is diffused, or spread out by the clouds, which turns the hard light from the sun into a large light source, which produces a soft, diffused type of lighting.

An overcast sky acts as a huge softbox to diffuse the harsh light of the sun. The soft light is a low-contrast light source that does not produce the distinctive shadows of a hard light.
The most flattering lighting for portraiture is a soft, diffused lighting as seen in the image above.
When it comes to outdoor portraits, open shade provides the best opportunity for soft, diffused lighting. Just because the lighting is soft, we still may need to employ additional techniques to control the light.

The image above was created using open shade in the family's back yard. Nice soft light is evenly distributed across the family members.
Photographers considering a studio space may prefer a space with a north facing window since it does not have to deal with direct sunlight coming through it.
A north facing window is a great source of soft, diffused lighting throughout the entire day.

Lighting Design
Hard Light Sources
Hard light is described as harsh lighting from a small light source (relative to the subject) which produces strong and distinct shadows. Because hard lighting creates strong contrasts between highlights and shadows, it is often used to emphasize texture and form. Hard lighting is considered to be unflattering for portrait subjects, but it may be appropriately used to create drama or to put emphasis on facial features.
Hard light sources are generally hard because they are small and not diffused. Hard light sources include portable flash, parabolic reflectors and bare studio lighting sources. The sun is also a hard light source. Even though the sun is very large, its distance from the earth makes it appear small.
This is important to understand because it is not just the size of the light source being small that makes the lighting hard; it is also the distance of the light source from the subject that will determine the light quality. Even a softbox can be a hard light source if it is used too far away from the subject.
Soft Light Sources
Soft (diffused) light sources are generally soft because they are larger in size and often used at close distances to the subject. An umbrella or a softbox, for example, alters the output of a hard studio light or flash by enlarging the size of the light source as the light bounces off of the reflective surface or shoots through an opaque fabric.
The closer the light source is to the subject, the softer it becomes. The further away the light source is from the subject, the harder it becomes.
Softer light is generally considered to be more flattering to portrait subjects because it tends to hide wrinkles and blemishes. The larger the source, the softer the light.
It is also often used in landscape photography because it has considerably less contrast than hard lighting. Less contrast means the tonal values will be more even and controlled.
Commercial photographers will also use soft light to control or eliminate distracting shadows which might take away from the product.
Utilizing a fill light will be a large light source so that it will work to reduce the shadows of the main light without creating additional shadows of its own.
Flat Lighting
Lighting that strikes the subject from the front or that does not rake across the subject to bring out texture and detail is said to be flat light. An overcast day is a good example of flat lighting. Even though an overcast day is soft lighting, the overall effect of it is to be flat because it is not directional.
Hard light can also be flat if it strikes the subject from the front and does not rake. For example, an on-camera flash creates flat lighting. A subject that faces directly toward the sun will also appear flatly lit if the sun is behind the camera.
Flat lighting is not always bad. It is commonly used in product photography as well as fashion photography.

A light tent (above) is used to create very flat and shadowless lighting for product photography.
For fashion photography, flat lighting diminishes the features of the model to focus more attention on the clothing or other product.