Module 5E: Exporting Images for Display and Print
![]()
E. Exporting Images for Display and Print
Pixel Dimensions
If you bring an image into your image editing software, you can check the image size.
Notice this example indicates the pixel dimensions at 6000px wide by 4000px high.
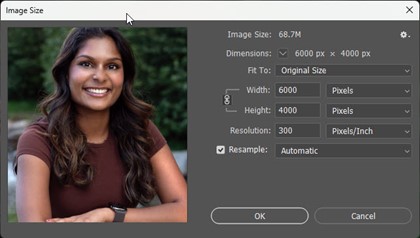
This image was done with a 24MP camera, and we already know that a megapixel is one million pixels so 6000x4000=24,000,000.
If we view the image with Pixels selected in the height and width, it makes sense that we also see the image is 6000px X 4000px.
When we view the image size with Inches selected, we see the image size is 20inches by 13.333 inches at 300 PPI. (Do the math and you see 20x300= 6000 and 13.333x300=4000 – our original pixel dimension)

Also notice the box marked Resample. If you open the dropdown menu, there are several options for resampling.
When resampling is unchecked, the software will allow the user to change one of the variables, width, height, or resolution.

Changing any one of the variables automatically results in a recalculation of the other two to maintain all of the original data.
Changing the height or width only increases or decreases how many pixels are allocated per inch.
With the resampling box checked, we can now make adjustments to the height and width of the image independent of the resolution.
In doing so, the software will either eliminate unnecessary data (down sampling) when smaller images are required or add pixels (interpolation) when images need to be printed larger than the original file can produce on its own.
Down sampling
Notice how this image was resized from its original width of 20 inches down to 10 inches. Resampling reduced the file size from 68.7 MB to 17.2 MB and reduced the pixel dimensions from 6000 x 4000px to 3000 x 2000.

The software ultimately discards data in order to reduce the file size. This data would not be recoverable if this image is saved. This is why it is critical to use the “Save As” or “Save a Copy” feature using a different file name. This way, you can preserve all of the editing that was originally completed on your largest resolution file.
Interpolation
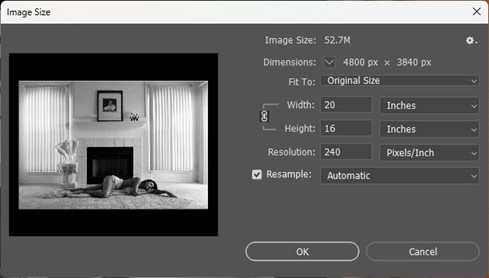
In this sample, the image width was increased from 20 inches to 30 inches.

Notice the file size increased from 68.7 MB to 154.5 MB and the pixel dimensions increased from 6000 x 4000 to 9000 x 6000.
The software added pixels (interpolation) in order to upsize the image to a larger output.
Since most labs and printers have very sophisticated software for interpolation, it is generally accepted that the best practice is to allow your lab or printer to upsize images on your behalf instead of doing so before you deliver the file.
Most labs do this without you even knowing it. They simply run the file through software which dramatically increases the file size - before the image is printed. The software adds pixels and estimates their tonal value based on surrounding pixels.
This interpolation process is so efficient, many labs will request you submit your files at 240-250 PPI to save time in uploading and downloading.
Excessive interpolation has the potential to degrade an image by the introduction of unwanted digital artifacts.
PPI vs DPI
Resampling allows the photographer to make critical decisions on how the image will be prepared based on the final use for that image. This is why it is best to manage file sizes based on output.
Pixels per Inch (PPI) defines the resolution of a digital file and how it is viewed on a digital display.
PPI refers to the number of pixels contained within one inch of an image on a digital display.

Dots per Inch (DPI) defines how many dots are used to create the printed image.
The more dots per inch, the higher the resolution and the better the detail.
Where PPI describes the digital resolution of a file, DPI describes the printed resolution of an image.
File Size and Enlargement
When it comes to image capture, the best practice would be to capture and edit at high resolution and then export final images with the end in mind.
It is likely that processed images will either be printed by a photographic process, a 4-color process, an inkjet or dye sublimation printer, or the image may be used for digital media on the web or for larger digital displays. Each of these has its own set of parameters that will need to be met for proper reproduction.
Sizing for the Internet
The two primary parameters you will need to meet are the requirements for resolution and the color space required to reproduce the image to meet expectations.
JPG and PNG images used online require a minimum file size to display properly and efficiently. Images can be downsampled based on the required pixel dimensions for the image.
Resolutions are set by height and width in pixels. Size images to allow for 72 to 94 PPI for display.
Larger files that are used on the web will take longer to load and are subject to unauthorized downloading and printing.
Sizing for Digital Presentations and Displays
We live in a digital world filled with display screens of various sizes and shapes. To properly prepare digital images for display on digital signage and displays, the photographer will need to know the required pixel dimensions and color space for the destination display.
With today’s digital displays and large screens, larger file sizes may be needed to present high-quality images on these larger devices such as digital signage locations such as airports, malls and fast-food locations.
It is best to know the pixel dimensions of the display and the color space in advance so that you can prepare files at the appropriate resolution.
Continuous Tone Printing
Traditional photographic printing and dye-sublimation printers utilize a continuous tone process for printing.
Photographic Printing
Professional photo labs now use printers which utilize laser technology to expose photographic paper which is then processed in traditional photographic chemistry. These printers produce images with very high resolution. Image files sent to the lab should be properly sized to produce the highest quality, usually 240-300 PPI before interpolation.
A dye-sublimation printer also provides a continuous tone process. The printer lays individual layers of Cyan, Magenta, and Yellow dye onto the paper with a thermal print head which transfers each dye layer from a ribbon onto the paper.
Printing with Dots
Inkjet printers and 4-color printing presses don’t print with continuous tones, they print with tiny drops of inks or dyes. The resolution of an image in this process is dependent on how many dots per inch are used in the printing process.
Inkjet Printing
Inkjet printers use tiny droplets of ink to create an image on paper. Because they can spray so many droplets within each inch of the images, they don’t require such high-resolution files to print with fine detail.
To print with fine detail, image files will need to be somewhat larger than images prepared for online use. Recommended resolution for most inkjet printers is 200-250 PPI, although higher end, photo-quality printers may require 300 PPI or more. It is best to check with the manufacturer of the printer to determine the optimum resolution.
Oversized files do not necessarily increase the resolution of an inkjet print and ultimately can slow down the printing process without any added benefit. Some printers will automatically downsample files that are too large.
Four-color or Press Printing
Brochures, books, magazines, and other products that are commercially printed on a 4-color press require higher resolution files to achieve a quality reproduction of an image. Resolutions for these services are usually 300 PPI and larger.
For large reproductions, provide the largest file size that can be generated.
![]()
The following is a guide for preparing final images for delivery based on a variety of end uses.
JPG - A lossy file format most commonly used because of its compression. The compression of the file allows for smaller file sizes for storage and for faster transmission of files over the internet. JPG files are the primary file type for photographic images that will be presented on digital displays.
TIFF – Because this lossless format retains its quality, flattened and un-compressed TIFF files can be used when delivering images for use in publishing and high-end image reproduction.
GIF – (Graphics Interface Format) This lossless format is used with small graphics on the web and email. It can also be animated. GIF images only allow 256 colors, so they are not suited for photographic images.
PNG - (Portable Network Graphics) This file format uses lossless compression without artifacts and has a very broad color palette. Because of its sharpness, it is well-suited for colorful graphics on the internet.